Thursday, April 28, 2011

Going on a Picnic!!

So me and my good-long time friend decided to have a picnic tomorrow with her kiddos! And of course this was great opportunity for me to create “Picnic” themed cupcakes! I instantly began drawing up ideas and looking through the book and online for neat and fun ideas. So I ended up doing 5 different designs- Mini-sunflowers (didn’t turn out so flowerly), Butterflies, M&M flowers, ants invading the picnic, and teddy grahams having a picnic!

The recipe used for the cupcake was the Hershey’s one earlier mentioned! It’s VERY important that when you use this recipe that you FOLLOW the 2/3 filling in the cupcake liners. Otherwise, they overflow (some did for me). But they made the apartment smell yummy!

I began the frosting same way with the Easter cupcakes-white and green, creating the two-toned grass. This time the frosting wasn’t whipped so it formed better. Unfortunately, I didn’t think ahead enough to set aside some for the flowers. I had to make some extra and the recipe I did wasn’t exactly “stiff” as I wanted it to (the sunflowers “melted”). I find it really challenging to estimate how much frosting you are going to use for the “base” of the cupcake and the decorations on top. I will do some further research on how to figure that one out.

After creating the grass, I began creating the M&M flowers and butterflies. I did this by placing the M&M’s how I wanted them in the appropriate shape. Then, I took some pretzel sticks and broke them in half and stuck them at the top of the butterflies to create antennas and used normal pretzels for the wings. For the flowers, I just decided on the colors and placed them in the basic hexagon shape. For the Ants invade, I used red and white airheads, cut them into squares and did the checkered design. Then, I placed broken pretzel sticks down and M&M’s over them and volia! Invading ants! For the Teddy Grahams, I just placed the teddys in a circle, added runt “fruit” candy and mixed in colored Nerd candy to create a “feast” for them! (They seemed to enjoy it!)
Now for the “sunflowers”, I just placed mini-oreos on the grass and used the M cut on the bag (should have done the V cut because they are petals/leaves) and placed the yellow frosting in there (homemade frosting and Golden Yellow Wilton “goo”) and tried to create the sunflowers. I would have worked better if the petals didn’t start melting from setting out in room temp (I created more of Icing than frosting). 
Overall, these were definitely fun and successful for me minus the sunflowers. I need to create a better recipe for frosting and learn to better estimate how much to use for the base and decoration.

Tuesday, April 26, 2011

Upcoming Projects/ Requests

So after the successful taste and looks of my Easter Cupcakes, I have been getting and coming up with some more ideas! Here’s my list:


Picnic-themed cupcakes
            Mini-sunflowers, teddy grahams, and ants
            Chocolate flavored with white frosting base
B-Day cupcakes
            Monkeys, and Elephants
            Vanilla cake with vanilla frosting and Chocolate? For Elephants (further research needed)
Mother’s Day cupcakes
            Butterflies, dragonflies (maybe) and flowers
            Hershey’s recipe for the cake and white frosting base
My 21st B-Day cupcakes
            Colors: green, black and purple? Still need some inspiration ideas…
            Chocolate-mint flavor and white frosting base
Memorial Day cupcakes
            Patriotic flag
            Vanilla and Vanilla
If anymore ideas, requests, or challenges come up I’ll post them! And I advise using a vanilla base frosting because it’s the easiest to color (if that’s what the project requires). So start sending ideas my way!

Sunday, April 24, 2011

Easter Cupcakes!

So before I begin to describe my tastefully experience let me point out a few MAJOR things about baking in general:

1. What you "copy" from the book may not turn out the way it looks in the picture (for me it turns out better 8 times out of 10)

2. It's REALLY MESSY! So for you clean freaks... Good luck!

3. Accept Mistakes and it can be time consuming when you first start out because these are "experiments" until you are an expert.

Now that that's said and done with, here's how my experience went:


Since this was my first try from the book, I just started with boxed cakes and "canned" frosting. I also always plan on giving these out so of course I try to do more than one flavor; vanilla and chocolate mainly. So I baked these Saturday morning to get them baked and cooled on cooling racks (a must for baking!). I don't really care for fancy liners, white will do just fine; it's what's on top that counts to me (unless it's a wedding or the client requests certain colored-liners).


Unfortunately, I didn't get a chance to decorate these until late that night. I finished (including  clean-up) at midnight (started around 9-10ish)  So what you want to do before decorating was obtain all your proper ingredients and get them out; along with a clean, open space to decorate on. I used a cookie sheet and container. My first step is always the basic icing; and I started with white. To make it green, you can go about this 2 ways: food coloring in liquid form or in Wilton's "goo". (I not sure what it's called, but it comes in little plastic containers and it's potent!) So I use the "goo". And I mix it with a skinny spatula. Afterwards, I (according to the book) take a storage size ZIPLOCK bag (that's right no pastry bag used) and fill it with the green frosting, and you put it on 1 side of the bag; make a darker green and add on the other side (two colors). Take scotch tape and tape the corner you are going to use (6 layers) and cut a v out of it (for leaves and petals) or M shape (for fur or grass). Now unfortunately, I did the M shape, but my frosting ended up being "gooey" so the exact shapes didn't turn out like in the book; it turned out better!
A messy grass look was much more appropriate for my Easter baskets! So, using the "stabbing" method, I decorated the basket and peeps's cupcakes. Then I cut the licorice in half and pressed the ends into the baskets and placed the peep's on theirs. Next, I specifically and individually placed the "eggs" on the baskets and peeps. And viola! I have peeps and baskets!


My next mission was the bunnies. Now in the book they are hiding and all you can see are the feet and tail. I begin with this idea but ended with them peeking out at you! (Again it's ok!) Now you wonder how?

So in the book they use white soft peanuts as the feet (those things taste bad so I used cookie strips). And they use chocolate covered sunflower seeds and regular M&M's. I used peanut butter &M's and was going to put slight "dots" instead of the sunflower seeds. Before I get ahead of myself, let me begin with creating the "bunny". So the color of the bunny is dark brown so I used cookie crumbs (oreos or the off-brand) and I used the filling to hold the crumbs on the cupcake. After I frosted and applied the crumbs, I used some of the left over frosting (from the grass) and stuck the cookie strips to the bunny (the crumbs get in the way); then the M & M's to the strips. So after applying this, I realized that WOW! Those are some big M & M's and with the "tail" on there (mini-marshmallows), it kind of looks like a face; volia! ( I didn't use the red M & M's because you would have a "demon" bunny haha!). Ten I cut the left over twizzlers in individual strips then in smaller sizes and created whiskers (also applied with the leftover frosting).

So overall, I believe this was a semi-success when comparing to the book and a complete success when comparing to me and my talent in this! Now I realize that Easter isn't about bunnies or spring time, it's about Jesus being risen again, proving life over death after he went through Major torture and pain to die on the cross for our sins so we can be saved! I was intending to put crosses on some of the cupcakes and realized that I forgot after I finished them.

Tuesday, April 19, 2011

What is a cupcake? Un-which we would we call it by any other name would it taste as sweet?

So recently I’ve began to notice that the new thing is Cupcakes! Stores that sell them, they are themed in rooms, parties and are become more popular at weddings! So one can wonder where did cupcakes come from? So I began to do a little researching on the "Tastetory" and here are some fun results:
The “cupcake” evolved in the United States in the 19th century, and it was revolutionary because of the amount of time it saved in the kitchen. There was a shift from weighing out ingredients when baking to measuring out ingredients. The name given in Britain and generally in the USA to any small cake baked in a cup-shaped mould or in a paper baking cup. In the USA the term may have originally have been related to the American measuring system, based upon the cup." (Oxford Companion to Food, Alan Davidson (p. 234)                              There are two theories: one, the cakes were original cooked in cups and two, the ingredients used to make the cupcakes were measured out by the cup. Which is true? Both! We have historical evidence (old cookbooks) that support both theories.
In the beginning, cupcakes were sometimes called "number" cakes, because they were easy to remember by the measurements of ingredients it took to create them: One cup of butter, two cups of sugar, three cups of flour, four eggs, one cup of milk, and one spoonful of soda. Clearly, cupcakes today have expanded to a wide variety of ingredients, measurements, shapes, and decorations - but this was one of the first recipes for making what we know today as cupcakes. 20th century cupcake variations are endless. They range from simple to sublime. Baking papers come in designer prints. Individual portions and easy clean-up make cupcakes perennial favorites for classroom birthdays and bake sales. A survey of American cookbooks reveals the interest in cupcakes, as food in their own right, has grown over the years. Muffin tins, also called gem pans, were popular around the turn of the 20th century, so people started created cupcakes in tins.
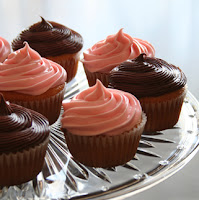
Since their creation, cupcakes have become a pop culture trend in the culinary world. They have spawned dozens of bakeries devoted entirely to them. While chocolate and vanilla remain classic favorites, fancy flavors such as raspberry meringue and espresso fudge can be found on menus. There are cookbooks, blogs, and magazines specifically dedicated to cupcakes (like this one!) Chefs and bakers publish books with decorating tips and fancy ideas for ingredients to use in cupcakes. Food magazines publish special issues with full-color photography and recipes submitted from all over the country.
Sources:
History of the Cupcake. (n.d.). All about Cupcakes. Retrieved April 19, 2011, from http://iml.jou.ufl.edu/projects/spring07/ayers/history.html
Olver, L. (n.d.). Cakes: Cupcakes. Food Timeline. Retrieved April 19, 2011, from www.foodtimeline.org/foodcakes.html#cupcakes
Yumm! That was some tasty information to gobble up! Now that we know how cupcakes came to be and where they got their name from, let’s briefly jot down some common recipes and frostings:

There’s chocolate and vanilla, spice, pumpkin, raspberry, peanut butter, and combining these flavors also creates original flavors too! When you think of chocolate, do you think of common brands like Hershey’s, Ghiradelli, or Nestle? They have common cake recipes you can easily use for cupcakes! I personally love the Hershey’s recipe on the back of their coca box! (Very moist and rich in flavor):
HERSHEY'S "PERFECTLY CHOCOLATE" Chocolate Cupcakes
Ingredients
2 cups sugar                  1-3/4 cups all-purpose flour              3/4 cup HERSHEY'S Cocoa
1-1/2 teaspoons baking powder                               1-1/2 teaspoons baking soda
1 teaspoon salt             2 eggs                     1 cup milk             1/2 cup vegetable oil
2 teaspoons vanilla extract                       1 cup boiling water
Directions
  1. Heat oven to 350°F.  Stir together sugar, flour, cocoa, baking powder, baking soda and salt in large bowl. Add eggs, milk, oil and vanilla; beat on medium speed of mixer 2 minutes. Stir in boiling water (batter will be thin). Line muffin cups (2-1/2 inches in diameter) with paper bake cups. Heat oven to 350°F. Fill cups 2/3 full with batter. Bake 22 to 25 minutes. Cool completely. Frost. About 30 cupcakes
Now I’m not a fan of vanilla cupcakes (really I think they are boring!) but I’m trying to be diverse here so I’ll had a simple vanilla recipe:
VANILLA CUPCAKES
Ingredients
2/3 cup butter, softened                        3/4 cup superfine sugar      1 1/2 cups self-rising flour
3 eggs       1 teaspoon vanilla extract (for whiter cupcake, use clear vanilla)

Directions

  1. Preheat oven to 350 degrees F (175 degrees C). Grease a 12 cup muffin pan or line with paper baking cups. In a large bowl, mix butter and sugar with an electric mixer until light and fluffy, about 5 minutes. Stir in the eggs, one at a time, blending well after each one. Stir in the vanilla and flour just until mixed. Spoon the batter into the prepared cups, dividing evenly. Bake in the preheated oven until the tops spring back when lightly pressed, 18 to 20 minutes. Cool in the pan set over a wire rack. When cool, arrange the cupcakes on a serving platter.

One of my FAVORITE websites for recipes has been www.allrecipes.com (the site speaks for its self!) because they not only have recipes but you can change the serving size you need and they’ll calculate it for you! For future posts, you may find the recipe on this site!


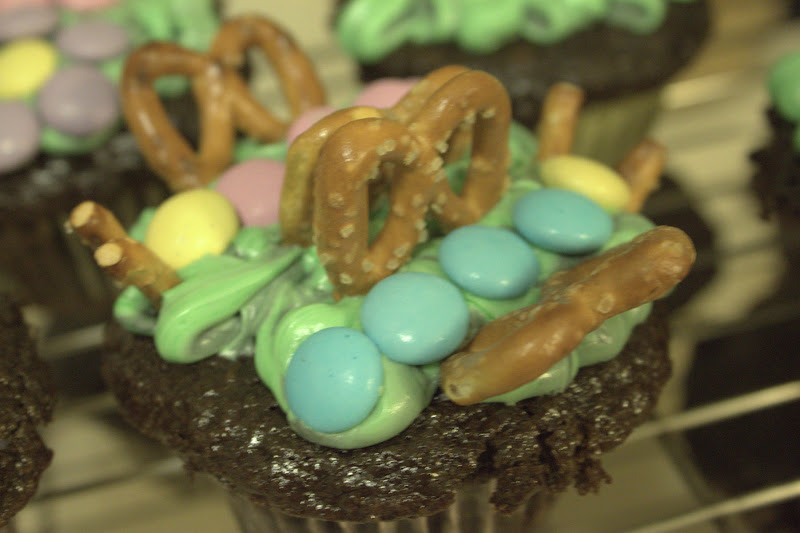
Now that we are sweetened up on some tasty history and beginning recipes, I will reveal my first challenge: EASTER-THEMED cupcakes! I will create 3 different variations:  1. egg basket   2. Hiding bunnies   3. Chillin' peeps
     The first one I found on Hershey's, second from the book, and third out of my head! So wish me luck on this and hopes for a beginning that will create artwork one can actually destory with their hunger!