Friday, June 22, 2012

Sweet Tea Cupcakes


There’s a few things that really say “southern”. Cobbler, pecan pie and sweet tea. A regular requested a new flavor: Sweet Tea cupcakes with Lemon-based frosting! So I began research and went to work!


 I changed the recipe I found up a bit. I accidently added all the tea/milk mix into the batter instead of half. I have found heavy whipping cream successful in frosting so I decided to add that to the frosting recipe. (I micro waved it first then steamed 3 tea bags. One bag broke from the extreme heat and so some loose tea was incorporated into the frosting—didn’t hurt it.) I also added lemon juice too. I was successful in the frosting and the sweet tea cupcakes successful as well!


Here’s the ravings:

“It was like eating a glass of good sweet tea.”

“The frosting was light and a great combination with the tea cupcake.”

“I wouldn’t be offended if you made a more concentrated “tea” for the batter.”

“They were very moist. Not too sweet; creamy and perfect.”


So overall, success! I’m excited to try out more drink-based cupcakes! 

Thursday, June 21, 2012

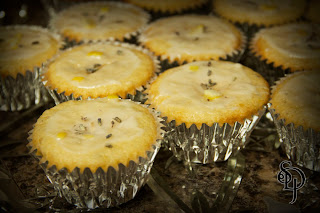
Healthy Cupcakes: Lavender-Lemon


Awhile back I was asked, “Do you make healthy cupcakes?” What they meant was, “Are there delicious healthy cupcakes?” My answer is simple: yes.


I have finally gotten around to making them! The recipe was: Lavender-Lemon Cupcakes. It was simple and I like how the icing is made of lemon juice and powdered sugar (with lemon zest and lavender too); no butter! I only ended up using ½ of butter and they taste delicious! Not too heavy and the glaze (icing) was a nice sweet touch!
I’m excited to see what other yummy delicious and healthy cupcakes are out there! (fruit-based?, savory?)


 Ideal for: bridal showers and tea parties

Thursday, June 14, 2012

Cake Decorating Classes: Course 3, Class 2


We created gum paste flowers this week! It was really fun and truly fascinating! You create the layers and then gum glue them together. You have to go fast or it will dry out and you have to roll the layers REALLY thing 1/16” or thinner actually! And sometime the layers have to dry before you can combine them (in dry air no problem; humid air some problem!) 

We first did the buds for the flowers last week so they were nice and hard to work with.

The first flower we did was the cal lily. We rolled out the shape (a heart) and then wrapped it around the cal lily former to set. Then we rolled the pollen for the middle part, rolled that in yellow sugar and let it set for a bit. After letting them “set” or harden, we gum glued them together! So pretty it turned out!


 The second flower we did was the rose. We created the bud first. Then cut flower petal shapes and “wrapped” them layer by layer with gum glue to the bud and volia! A rose! (There’s more to it than that but that’s the just of it).


For the final flower, we created a carnation! We created the base last week. This one HAS to be super thin to get the ruffled look. Depending on how fast they dry to will also let you know if you need to make more layers than normal. Those started out as plain circles then we ruffled the edges and let them set out a bit. After setting, we gum glued them together and volia! Carnations—my favorite of all the flowers we made!!

 Next week, we’re supposed to make the daisies but I’ll be gone unfortunately. 

Wednesday, June 6, 2012

Cake Decorating Classes: Course 3, Class 1


So we played with Fondant and Gum Paste today! It was really fun! You have to work fast and keep what you’ve cut (but not finalized) covered or it’ll dry out. You have to have your fondant rolled out at a certain depth for it to work right. Patience is key! You dust your area with combined powdered sugar and cornstarch and your hands lightly coated with shortening to prevent sticking.


I believe the main ingredient in fondant is marshmallows. We created a big fondant bow and bases for our gum paste flowers that we’ll create next week!


It feels like playing with play-doh! I learned a lot this week! Can’t wait til next week (and I’ll be missing week 3 unfortunately as I’ll be out of town). 

Tuesday, June 5, 2012

Cake Décor Class 3 and 4, Course 1


For week 3 we finally got to decorate cupcakes! We learned how to fill them (which I already knew), create little flowers and do the spiral effect on top. We also learned how to make leaves too (already knew that--nice recap though).


 I already knew how to do the spiral effect before but my instructor used a closed star tip and it creates a much fluffier effect! The flowers were fun to create too!


For class 4, it was our final! I ended up doing a cake: Boston Cream Pie to be exact! The top I frosted earlier before class and then decorated the rest there. 


Most of the class involved decorating, but we learned how to make roses and practice writing which was a nice refreshment! And Volia! I have officially completed Decorating Basics Course 1!  This Wednesday I’m moving right into Fondant and Gum Paste! I’m so excited!